

|

|

|

|

|

|


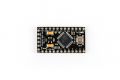
The OSEPP™ Pro Mini board is a miniaturized version of the OSEPP™ Pro, which in turn is a stripped down version of the OSEPP Uno. Basically, this is as small as it gets which allows for easy concealment in projects.
| Microcontroller | ATmega328P |
| Clock Speed | 16 MHz |
| Flash Memory | 32 KB |
| SRAM | 2 KB |
| EEPROM | 1 KB |
| Operating Voltage | 5V |
| Input Voltage | 5-12 V |
| Digital I/O Pin Count | 14 (including 6 for PWM output) |
| Analog Input Pin Count | 6 |
| Other Connections | Serial communication (requires header) Power (requires header) |
| Dimensions | 1.34 x 0.71 x 0.08 inches (34.0 x 18.0 x 2.0 mm) |
| Power Source | DC power supply |
Highlights:
- 8-bit AVR RISC-based microcontroller running at 16 MHz
- Extremely small profile – less than 1/5 the size of the OSEPP™ Pro board
- Compatible with existing Arduino software libraries
Features:
This board is the smallest OSEPP™ board thus far, but it still packs the same ATmega328P microcontroller running at 16 MHz. Many of the optional connections and devices for development have been stripped out, thus allowing for a massive reduction in PCB estate. This board is meant to be a permanent fixture in a developed project.
Availability:
| Stock Code | Product Name |
| PRM-01 | OSEPP™ Pro Mini |
Notes:
This board is based off of the Arduino Pro Mini designed by
SparkFun Electronics, and is released under the Creative Commons
Attribution Share-Alike License. The original design can be found at
http://arduino.cc/en/Main/ArduinoBoardProMini
Downloads:
| OSEPP Pro Mini Schematic (PDF) | |
| OSEPP Pro Mini EAGLE Files |  |
Learning Center:
What You Need
- Arduino Software (http://arduino.cc/en/Main/Software)
- USB to mini-USB cable
- FTDI Basic Breakout (http://www,osepp.com/electronic-modules/breakout-boards/96-osepp-ftdi-breakout-board)
- 1×6 male pin header
- PC/Mac with a USB port
Uploading Your First Sketch
- Get the Arduino software if you have not already
- Download from http://arduino.cc/en/Main/Software
- Unzip the zip file to somewhere like C:\ (on Windows), so you will end up with a folder like C:\arduino-0022
- Prepare for serial communication
- Connect the mini-USB end of the cable into the FTDI Basic Breakout
- Connect the other end of the cable into a USB port on your PC/Mac
- If your computer prompts for drivers, point it to the “drivers\FTDI USB Drivers” subfolder of the Arduino software, e.g. “C:\arduino-0022\drivers\FTDI USB Drivers”
- Connect the 1×6 male pin header to the socket of the FTDI Basic Breakout
- Connect the other end of the male pin header to the board, match up the pins from the FTDI Basic Breakout to the markings on the short edge of the board. Because the connection is not soldered, you will need to hold the pins at an angle so they make firm contact with the board.
- You should now see the red LED near the center of the board light up
- Load the sketch
- Open the Arduino software
- Open the LED blink sketch: File menu > Examples > Basics > Blink
- Select the Pro Mini board: Tools > Board > Arduino Pro or Pro Mini (5V, 16MHz) w/ ATmega328
- Select the serial port: Tools > Serial Port. This is the serial port for the FTDI Basic Breakout. If you do not know which one this is, you can find out by going into Device Manager > Ports (COM & LPT), and look for a “USB Serial Port (COMx)”
- Upload the sketch: File > Upload to I/O Board
- Wait for the “Done uploading” message in the bottom blue status bar
- The LED near the reset button should now blink slowly
- Congratulations! You have successfully uploaded your first sketch to your board.
IMPORTANT NOTICE:
| Thanks to some of your feedback, we found out that some of our Pro Mini boards from a certain batch were loaded with the UNO bootloader instead of the Pro Mini bootloader the manufacturing process.
The good news is that the boards are still fully functional even with the wrong UNO bootloader (even faster according to some of you). There are a few things that can be done to alleviate the problem: 1. Use the board as is and simply select “Arduino Uno” as the board type from the Arduino IDE. Since the Uno and the Pro Mini share the same capabilities (same digital/analog pin count), it will not affect the sketches that are loaded. 3. Send the board to us and we will load the correct bootloader on it for you and send it back. If you wish to follow this route, please contact us at This email address is being protected from spambots. You need JavaScript enabled to view it. and we will make the arrangements. To identify if the board has the Uno bootloader loaded, provide power to the board then press and release the reset button. If the LED next to the reset button blinks twice successively, then it is the Uno bootloader. Please accept our apologies for the little hiccup. |